Double Trouble

A couple of weeks ago, I noticed my Defender was not making its customary fan noise. I brought out my newish digital multi-meter, the one that sounds warning beeps then goes off after a few minutes unless you keep pressing the power button in time to keep it on, unplugged the low voltage power connector, and inserted the probes. Just a few mV, not 15 Volts AC. Defective power supply cord, again.
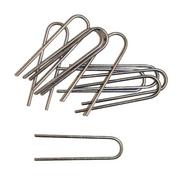
When not using “the clips” to press the cord down flat on the ground under the grass, the cord is vulnerable to inattentive lawn mowers. This cord had never suffered the ultimate insult, but had acquired some nicks and cuts over its 20 year life. I had repaired one nick by covering the cut insulation with liquid electrical tape. Keep out the elements, I congratulated myself at the time.

Taking it inside, there was no obvious damage to the cord, but it definitely didn’t work reliably. There would be moments where the indicated AC voltage would jump up when wiggling the cord, but nothing definitive. At this time, the newish multi-meter was beeping and requiring periodic attention, which led to the anxiety of not finding a problem.

I replaced the multi-meter with one of my trusty Simpson 250 analog meters. This meter can run forever with no problems of going off or needing new batteries (except for the Ohms function). Besides requiring more current from a circuit, the meter responds more quickly and precisely, and, with another pass through wiggling the 50′ low voltage cable, I found the problem in my earlier splice.

I opened the splice to find copper-colored dust where the copper wire strands once had been. The stranded wire had corroded much worse than i had ever seen. It was just incredible. I cut out the affected section and spliced the cord again. I had forgotten to add heat shrink tubing, so I had to insulate from without. Electrical tape is too bulky, unreliable, and not watertight. I didn’t want to use the liquid electrical tape because all my containers had grossly thickened, and I didn’t feel like thinning the mixture with toluene and xylene, etc., as it is a real pain to open and close the solvents, mix in a bit, shake and stir, then wait.

I remembered a substance I had discovered last year when I had problems with my above-ground pool. The top air ring was sun damaged and brittle. When the ring deflates, the pool dumps over a thousand gallons of water into the yard, which happened several times. No application of vinyl restorers could soften it. But I could repair each leak with a patch, however the supplied vinyl cement took too long to set, and didn’t last under the sun and flexing. I tried alternatives, including liquid electrical tape (which was a disaster), and finally found Shoe Goo, which is made for repairing shoes. It was handy because it works under water, seals very quickly, and seems to last pretty well in the sun.

So i tried encapsulating the splice in Shoe Goo. It is a bit tricky to work, as the substance thickens very quickly after it comes out of the tube. But in a few minutes, I had a rugged encapsulated splice!

The connector seemed intermittent. It turns out the contacts were getting old and oxidized. I somehow extracted the contacts and cleaned them, re-bent the internal springs, etc. Without a very tiny abrasive brush to fit inside the connector, I used a toothpick and some tinned hookup wire with mediocre results. Reinserting the contacts was a challenge. Nonetheless, the connectors could make a reliable connection to some tinned wire inserted to simulate the Defender’s power connector.

This was quite an effort, and I was looking forward to a successful completion. I deployed the refurbished power supply, plugged it in, and waited. Nothing. I took it out back to the bench, but all was well there. I redeployed it, and still nothing, no power. Out of time.

The unit sat like that for 2 weeks, off the air. I missed my MQTT messages, but at least I had another trap running.

Today I decided to fix the Defender. The power supply checked out OK. I opened the case (easy because long ago I took out the case screws and put them in a very safe place) and measured the AC input: Ok! But the NodeMCU had no power. A problem on the PCB assembly…

Fortunately the PCB assembly is easy to remove because of all the connectors and the AC connector mounting screws are all stripped anyway. Out it came and upstairs to the bench.
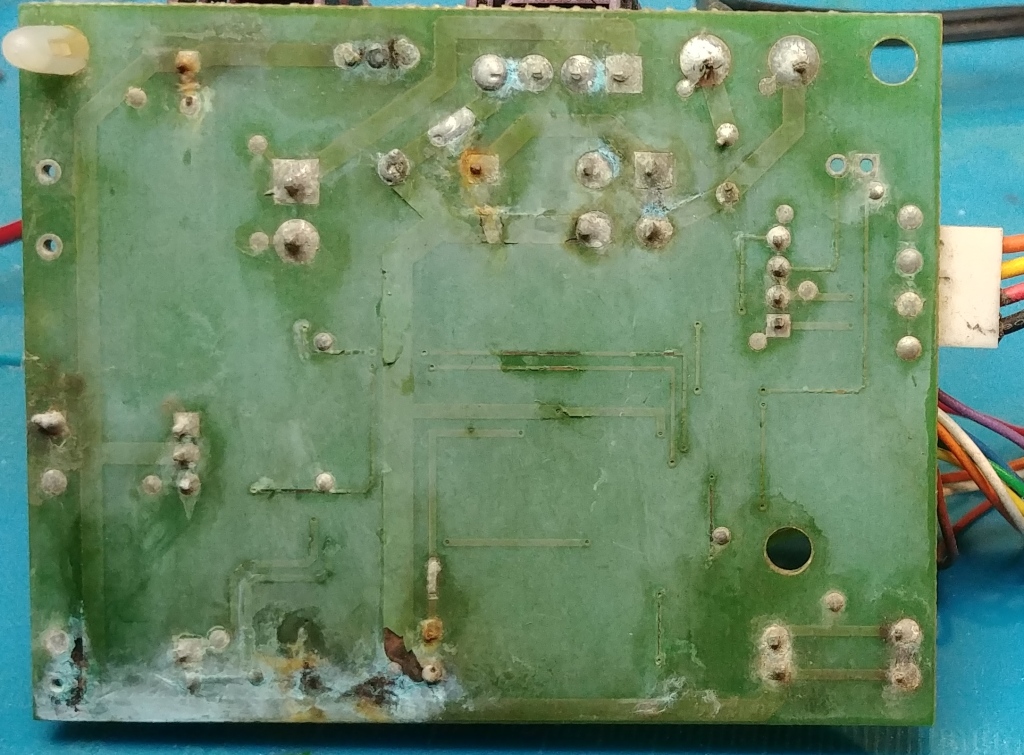
2002 Defender PCB assembly foil side. The wires on the right connect to the NodeMCU.

Well, isn’t that a fine looking board? Cleaning the board resulted in powdery copper coming off. The wide foil running down the left then along on the bottom horizontally is the 12 Volt rail. The thin trace from the bottom +12V running vertically 30% in from the left has a 3 mm break. There is a hole under the trace that seems to go to the +5V regulator chip on the component side. I don’t know if this is a large via for intentional contact to the chip or not. In any event, the foil was completely broken. No 12V input, yields no +5V output.

I scraped the 12V trace to expose some good copper and attached a very thin flexible wire jumper. The +5V regulator worked, and the NodeMCU signed onto the MQTT server, and sent messages.

Although in a 2013 wiki post I had mentioned not putting conformal coating on the repaired PCB, I now see the result: horrible corrosion, a natural consequence of that experiment. However, still after all these years too lazy to actually find the coating container, open it, test it, paint it on, and wait for it to cure, I started to look for something easier.

I ran across a can of flat matte spray acrylic to fix poster presentations. The can said it could be used on electrical components, and that was good enough for me (I didn’t want to add a corrosive or conductive coating, after all). Although I prefer gloss for easier inspection, this would do. So I sprayed some on the underside, dutifully turned the can upside down and cleared the nozzle, blotted the excess from the bottom edge, and wasted time until the coating was dry.

Outside, I installed the controller, powered on, and the NodeMCU came up. However, there was no fan. The unit ran for a bit, the igniter came on, the gas line solenoid opened, and I heard the pop of ignition. However, with no fan, this could not work.

This time I removed the entire so-called “power head” and brought it upstairs to the bench. While examining the unit, some disgusting looking bug scurried from the trap across the bench to start a new home in my lab. Oh, well. I wonder if I will ever find it. I re-seated the fan connector a few times, and the fan started to run. Perhaps the spray acrylic got on the contacts. Good enough for now. I took it outside, hooked it up, and it started. Hooray!

So after a silent period, the trap is again running. You can see the MQTT messages in “broker.hivemq.com” with the topic “MMD/#”. Here is the message from “MMD/esp8356707” at the time of this writing:

Temp=120.1C (-0.2) at 5:11711 F=1 I=0 G=1 S=1 E=0 T=28.5C H=57.3% M=26728 (247/1024:5984) R=70~140 W=-74.85 B=0.0 V=3.5

The combustion temperature rise is about 92°C above ambient, typical.

I should mention that looking at the Shoe Goo encapsulated splice, I noticed a greenish spot, which is not encouraging. I may have to revisit this splice. Stay tuned.

Funny Fail – New Season 2022

For the first time in several years, I was standing in my driveway a few days ago during the day, and found myself attacked by a mosquito. Other family members had been reporting mosquito bites, but it seemed too early in the season for that, so I ignored them. However, after 2-3 more attacks plus two bites, that was enough. Time to fire up the traps!

My 16 year old daughter has taken an interest in machines, including small engines and legacy computers, so I invited her to help me set up my un-trusty circa 2002 Defender, modified a couple of years ago with the substitution of a ESP32 WiFi module to replace the Defender’s PIC controller, which I had stupidly blown up troubleshooting the trap’s many problems. The modification was done in a slipshod manner, and has not and was not expected to withstand the elements for prolonged periods of time. Compared with my newer unmodified Patriot, this unit is far more interesting and complicated, more can go wrong, so it was first, with the other on deck.

She plugged it in, and the fan started to spin. I opened my MQTT snooper app, and there was the Defender reporting its status. Nothing wrong with the electronics! I asked her to then attach the propane tank, and turn on the gas.

After a few minutes, the temperature rise was only 4°C or so. I waited for a while for the trap to enter the error state and turn off the gas, and restarted. I remembered that a new tank of propane in which the air is not bled after filling can take several attempts until the air finally bleeds out into the trap, and the propane is sufficiently pure to sustain combustion.

Well, I tried that 4 times, with the same result: only a very modest temperature rise. I then decided to try to bleed the tank like I saw my local hardware store (which charges a fortune for a tank refill), so I went to the tank. The bleed valve looked like it took a standard slot screwdriver, nothing fancy. However, finding a slot screwdriver took some time; it seems they are very popular with the tool “borrowing” crowd. Finally, I returned to the tank, inserted the screwdriver, and turned it to release the air.

Nothing! Nothing came out, not air, not propane. What? I used the screwdriver on an adjacent tank, which spitted air and propane, just like at the store. What could be wrong? I decided to substitute the propane tank. Picking up the Defender’s tank, I suddenly realized that it was empty! My (now long deserted) daughter followed my directions and connected the tank without mentioning that it was very light. I wanted her to do all the steps, so I never touched the tank. I thought that I had filled all the tanks at the end of last season, and could not imagine that there was an empty tank in line to be used. Moral of the story and new rule of thumb: you cannot start a trap with an empty tank.

This now highlights the need for an additional sensor to weigh the propane tank and hose so that a trap can have a new tank before it goes stop (with quick replacement action, the trap can keep going without restarting). Such a sensor would have alerted me immediately to the empty tank. Or I should follow my standard practice of weighing every tank before putting it on a trap. But the mosquitos were biting. I am ashamed to say I still haven’t weighed the tanks… Fear? Laziness? Both?

I had made some weighing scale design progress, but have not solved the issue of weatherproofing the strain gauge sensors on which the tank would sit. Any recommendations (via the forum) would be appreciated. How can we reliably weigh the tank in real time?

Defender Switches Combustion Modes

A few days ago, while acquiring data, I inadvertently interrupted the AC power to the old Defender, resetting the trap. Power interruptions happen all the time here, but this one somehow changed something, I don’t know what, and the normal operating temperature rise from the intake to the exhaust increased dramatically from ~85°C to ~94°C. Surprised, I tried cooling the trap to near ambient and restarting, but the thermistor temperature rose and stayed high, in the 130° range, close to the 140° limit I had set.

Puzzled, I reviewed my notes and blog entries, and discovered that this was a very typical range 2 years ago. I might have been using the wrong nozzle at that time. Since the change, during the last two days, the trap had caught only 20 mosquitos (although I didn’t see any around), compared with several hundred in the previous day (although just after a rain). The trap was running at about 128° with an ambient of ~34°, for a 94°C rise.

I then tried the electric tire pump on the Schrader valve, and it read 105 psi, which is very high. I ran the pump for several minutes, but there was no change in pressure – nothing was dislodged. Restarting the trap, the temperature rose even higher to almost 135°C. I had made it worse. It may not be a good idea to use an flaky auto tire pump to clear out a hot trap. Perhaps the contaminants from the worn-out oil-free pump have really clogged the nozzle, although the pressure went up high and stayed there. In any event, the nozzle had to be cleaned or replaced.

I found an old nozzle that had been cleaned and had a like-new 40 psi test fixture result. I was determined to change the nozzle as quickly as possible, no frills. Fortunately, I have a high torque electric screwdriver, so with that plus 2 large slot screwdrivers to open the combustion chamber, and nothing else, away I went.

Fortunately, the awful top case screws are long gone to a better place. Power off, remove the basket and top cover, unzip the 3 sheet metal screws into stripped plastic supports, unscrew somewhat the two hose clamp screws, remove the power jack, remove the solenoid from the valve, and it all lifts out. Turning the assembly on its side, remove the 3 machine screws holding the plastic exhaust port from the combustion chamber, then the last 5 screws holding the chamber together. Taking care to not break the circuit board, NodeMCU and other stuff, I used the two large slot screwdrivers to pry the case apart, and it popped open without too much effort. (I had a few times back in the past given up on applying new gasket sealer to the case, the old stuff seemed to work just fine, and nothing looked like it was leaking out, so there.) The nozzle assembly came out with some rotation, and then I replaced the nozzle. Reassembly occurred, but not before using the hose to spray the awful remains the last couple of year’s catches.

A bit of DeOxit on the power connector to try to address the intermittency, and, amazingly, the trap started without issue. The connector is still intermittent, however, but this was not the time to fix that. The mosquitos scored 2 bites, maybe real, perhaps imaginary bites. Not bad.

The trap with the cleaned nozzle went up to 127°, a 96° from 31°C rise, but has since calmed down to 124.6 – 33.1 = a 91.5°C rise. I don’t know whether this is a better operating point or not, only the catch rate can tell this, but at least a clogged nozzle has been changed. I have been measuring tank weights and catches for 3 days now, another post will provide some results.

Patriot Cleaned and Launched

After getting the Defender up and running then failing on Thursday, restarting, and failing again Friday morning, after repositioning the NodeMCU and restarting, by mid-day it had caught about 10 or so mosquitos, not too bad. These mosquitos convinced me it was time to start the Patriot, and perhaps get cracking on the Liberty conversion.

At the end of last season, the Patriot was suffering some failures during a run. Normally, a failing trap fails to start, but stopping in mid-tank was rare. I tested the pressure last year with the auto tire pump, and it was high. I decided to test again and clean it if necessary before deployment.

My test pump, a Viair P70 purchased in 2015, had suffered after being used to keep a ring-type above ground pool ring inflated. After two seasons, the ring had become brittle, and had several large tears, and several small leaks, which I had patched, and was able to inflate, with a slow leak. This required the shop vac to be applied every day, and after a few times when the plastic bag covering to the vacuum blew aside and let the rain in, the vacuum bearings started making a screaming noise, adding to the experience. When I was not perfectly diligent, a few times during the cool of the night, the ring deflated to the point where a cascade of about 1000 gallons of water escaped over a partial collapse on the pool’s low side. I dreaded waking to see this out the window or on the pool cam in the morning.

So I took the Defender software and adapted it to a pool ring inflater. This required a 12 volt battery, pump, trickle charger, 5 volt auto adapter, a solid state relay, and a pressure sensor, plus additional temperature and humidity sensors connected to a NodeMCU on an interconnect breadboard. The pressure sensor had to measure very low relative pressures absolutely. I made on using two paint mixing sticks and a 100 g strain gauge. The ends of the sticks were taped to the ring about 30″ apart, and the ring pushing against the strain gauge deflected it enough to measure. The previous and now backup visual measure was provided by leaning the pool skimmer handle at about 45° against the ring. If it sank less that 1/4 handle width, the ring was ok. Full scale was about 2-3 rings sunk into the ring. Water would flow soon after.

The system worked beautifully. However, as time passed, additional leaks developed, one or two every few days. Unless these were identified and repaired, the system would be pumping so much that the energy removed from the battery could not be replenished by the trickle charger in time for the next inflation, and the system would enter a downward spiral eventually ending in failure and excessive battery discharge, and the lost 1000 gallons.

The first pump, $10 from Harbor Freight, was quite small, and took several minutes to reinflate the pool ring. This wore out right away, and I had “repaired” the pump once or twice before (the pump piston seal if overheated looses its flexibility and does not seal effectively). So I use my “good” pump, the Viair P70, and it was very effective, until it too started failing, with the same issue. After a few repairs, trying various things like silicone grease to improve the seal, which was a disaster, the pump would last only a few days before not pushing any more air, or worse, leaking air from the pool ring. I tried to purchase a new piston seal, but was informed by the Viair rep that the pump was obsolete, no parts were in stock, and I would be better off buying a new pump. This was very disturbing news, as I hate planned obsolescence.

Back to the Patriot. I had ordered two pumps with analog meters and no digital on/off to replace the Viair. That in itself was a problem, since the replacement pump for the automobile has a digital set point, and requires toggling the on/off switch to activate the pump, which prevents turning the pump on by applying power (as in the inflater), and also prevents its use to measure the Mosquito Magnet valve orifice conductivity as inversely proportional to the pressure with a given pump output.

Anyway, the working-for-now Viair pump showed 102 psi, pump A, 89-86 psi, and pump B 83 psi. This was much higher than the Defender good nozzle pressures in the mid 30s, so the trap had to come apart. This was easy because the case screws were removed last year when the trap started failing. The Patriot nozzle is held in by a single Philips bolt, although three screws must be removed to raise the assemble above the case bottom to remove the nozzle.

The nozzle had no markings, and the orifice consisted of a single hole in the center of the head. This hole is about 0.010″ in diameter, or about a #87 drill bit size. I don’t have this size, but a #30 wire wrap wire fits perfectly. I could see some black material in the orifice, and holding the nozzle up to the light, it looked blocked, so I tried to use the wire wrap wire to dig it out. This caused the wire to break and lodge in the hole. A variety of stiff, sharp objects later, the blockage was gone, and the hole clean looking. Hooking it up to the pump showed pressures on 80 psi for the Viair, and 60 psi for pump A (pump B was disqualified for its clunky digital pressure gauge). This is still higher than a Defender, but the hole blew air perfectly, and I reassembled, and started the trap. The trap worked! I put in an octenol cartridge and left it running.

When checked today, both traps are running and catching mosquitos, even though we have not noticed mosquitos in the evenings. The mosquitos in the Patriot seem particularly agitated, angry even, don’t let one escape! No explanation for this other than perhaps the more spacious Patriot basket with its clear top prompts the mosquitos to fly up into the hard plastic.

So begins the 2021 mosquito season.

Defender Launched with New Software, Hardware

What a miracle. I replaced last year’s NodeMCU software with a latest and greatest tech version now released on the wiki, patched accordingly, started it up, and it is running. You can see it working (or not), using an MQTT client connected to broker.hivemq.com. Follow the MMD/esp8356707 topic, or MMD/# topic wildcard to follow any and all other units in development. Here was the one of the initial messages:

Temp=120.8C (0) at 5:465 F=1 I=0 G=1 S=1 E=0 T=34.5C H=17.6% M=26920 (243/1024:5857) R=70~140 W=-73.85 B=0.0 V=3.5

(Kindly refrain from sending commands to the Defender, thank you. We are testing the new board and software.)

I should mention that we are suffering from wireless connectivity issues caused by the proliferation of poorly designed wifi-6 and mesh routers and access points, however, the NodeMCU recovers fairly quickly, so a short duration MQTT “offline” message every now and then is to be expected until the router manufacturers update their products to not interfere with low band IOT devices.

We will see how long this lasts. It is amazing to me when things like this “just work.” As I was writing this as a reply on the forum, I was forced to type:

“… Well, I spoke too soon. While typing this post, the system went off line, and restarted.

Temp=124.8C (0) at 5:779 F=1 I=0 G=1 S=1 E=0 T=34.7C H=18.9% M=26920 (223/1024:5241) R=70~140 W=-72.85 B=0.0 V=3.5
Offline
Offline
Temp=118.6C (-0.2) at 1:3 F=1 I=0 G=0 S=1 E=0 T=34.9C H=19.6% M=27440 (255/1024:6242) R=70~140 W=-74.85 B=0.0 V=3.5…boot

The unit is going offline periodically for periods of ~22 and ~45 seconds. It is rebooting.”

That was the end of that post. I copied the text, canceled the post, and continued investigating.

The system would not stay running, repeatedly rebooting. Worried about the igniter failing because of too many cycles, I sent it the MQTT command to cool down with error. The error transitions the trap into an error state after the cool down. The idea was to see if a cool trap had issues with connectivity and rebooting. The previous hardware was able to function to 35°C without issue, and this was close to that. However, the ambient intake temperature is not the same as the temperature experienced by the NodeMCU, which is adjacent to the combustion chamber, nearly touching it.

After several hours, the intake (and combustion) temperature dropped to 17°C, quite a bit cooler, and I restarted the trap. It ran all night, but failed at 9AM, with last words:

Temp=124.8C (0) at 5:39647 F=1 I=0 G=1 S=1 E=0 T=38.7C H=21% M=26800 (223/1024:5241) R=70~140 W=-74.85 B=0.0 V=3.5

The ambient temperature of 38.7°C is pretty hot. This suggests that the NodeMCU was getting too hot for reliable operation. Downstairs, case off (Not difficult: I removed the screws several seasons ago and put them in a safe place, or did I?). The new NodeMCU was fairly deep inside the case, nearly touching the combustion chamber. I was thinking of inserting a fiberglass cloth, or some sort of heat shield, when I noticed the rather stiff wires to the “power” switch. “Maybe I could use these stiff wires to push the NodeMCU away from the combustion chamber” I thought. So I re-routed the wires to do exactly that. What a proud boy I was. Not only was the board further away from the chamber, there was no restriction to any air flow (what?) from a heat shield, not to mention being a low cost solution, although it does require “tuning” in the form of wire bending. It has been several minutes now, and it is still working:

Temp=120.8C (0) at 5:2476 F=1 I=0 G=1 S=1 E=0 T=29.1C H=36.3% M=26688 (243/1024:5857) R=70~140 W=-73.85 B=0.0 V=3.5

2476 seconds and still running! However, it does seem odd that the ambient temperature sensor is reading much lower than before. This Add-On is lacking certain mechanical sophistication. Perhaps the wire bends positioning the ambient temperature/humidity sensor may be a bit too imprecise.

Another issue is that the switched voltage divider scheme is giving a too-high value of 1024 for the open circuit state. The other hardware (boards) have had the open value of 1015 or so. The circuit (see the wiki) switches the ThermLo net between ground and open circuit. When grounded, the analog-digital converter (ADC), measures the voltage from +5C (connected to 3.3 volts from the NodeMCU regulator) into the divider with R5 (20k0) on the top, and the thermistor on the bottom into the ADC input (a ~330 kOhm divider). When ThermLo is open, it measures just R5 to the 330 kOhm input. This scheme allows the software to calculate the thermistor resistance by a ratio, and not depend on the imprecise 3.3 volt regulator as a voltage reference. However, the open circuit measurement must not exceed the full scale value of 1023 (or 1024), doing so will lose precision. Evidently the NodeMCU +3.3 is a bit too high, or the resistors into the ADC inaccurate, or both. Another issue to investigate.

Still, even without the added precision, the combustion chamber temperature probe does its job. Maybe I can forget about switching the bottom, and just rely on the kindness of the circuitry as it is and use the values as they are, and it will work sufficiently. This would free up a pin to use for something else, some other feature, for example, an additional indicator light for the Liberty, or some such.

Well, while I was writing this, the unit went off line again, last words:

Temp=121C (0) at 5:2674 F=1 I=0 G=1 S=1 E=0 T=29.5C H=39% M=26688 (242/1024:5825) R=70~140 W=-72.85 B=0.0 V=3.5

That was just after its triumphant report a few paragraphs above! Gotta go, see what happened, see you later!

… (Passage of time)

Back again. Mechanical iffy-ness includes the draping of the power cord from the house to the Defender across a walkway, with a loose coil at both ends. This is insufficient to handle a hose pulling the cord forcibly away from the Defender. Fortunately, the 2002 design used a connector that will release with excessive cord pull without too much damage. The new Patriot, with its screw-on connector, will be less forgiving. Anyway, the unit is back on the air, and happy times are here again, again, at least for right now:

Temp=120.3C (0) at 5:735 F=1 I=0 G=1 S=1 E=0 T=30.2C H=28.2% M=26856 (246/1024:5952) R=70~140 W=-74.85 B=0.0 V=3.5

New Season 2021

Welcome back to the Mosquito Magnet blog after a long off season. The forum has started to stir, a user has prodded me into releasing the source code to the NodeMCU software as a complete package, another user introduced me to a smaller but just-as-capable NodeMCU, the WeMos D1 Mini, and in preparing a release, updating the system software, etc., I needed a test machine, so I am finally starting the Liberty Add-On project. Check the wiki and forum, and stay tuned for more details.

On the forum, a discussion started regarding CO2 cartridges, and my reply started to veer off into blog land, hence this entry.

CO2 Cartridges

I think we have established that a clean nozzle is vital to the trap’s reliable operation, and that the CO2 cartridges are woefully inadequate (although I haven’t tried using one after each tank change!) to clear a clogged system. The problem is that the trap may fail to start because of some other issue, and using 3-4 of these irritatingly sort-of expensive and short lived capsules would drive anyone batty. Plus, the original directions of backing off and letting the CO2 flow for ?several seconds? when in fact it comes out in one quick “whoosh” adds an unacceptable dimension of doubt to the whole enterprise.

I should mention a few more details about cleaning here. I use brake cleaner, and haven’t tried MAF (perhaps more effective). After removing the filter, place both into a 4 oz glass jar, cover with solvent, and place the covered jar into a small ultrasonic cleaner filled with warm water, and run for about 30-45 minutes. This seems to work.

I then test the nozzle(s). I was fortunate enough to acquire a used Mosquito Magnet valve from ebay. I block the propane line intake port, screw the nozzle into the valve, and connect a prior generation electric automobile tire pump with gauge to the Schrader valve input. With the pump on, the cleaned nozzle reads 35-45 psi vs the >60 psi from an obstructed nozzle. If the nozzle reads high, it gets another round of cleaning.

Prior to starting the trap, the tire pump connected to a trap also gives the same indication of the nozzle’s condition. I have experienced pressures up to ~110 psi this way. My criteria for cleaning is trap failure, but this policy results in failed traps at inopportune times. For example, my “newish” Patriot trap was having trouble staying lit at the end of last season, but will I clean it before trying to put it in service? Nah. “Millions for Defense, Not One Cent for Tribute ‘No, no, not a sixpence, sir!'”

Actually, thinking about it, I probably should test the trap first, it’s just that I have to repair my prior generation electric tire pump(s) that have failed from overuse first. We shall see.

Patriot Deployed for Now

The Patriot survived the day and night on the patio, and was running this afternoon. i decided to deploy it to its operating location away from the patio. However, I didn’t dare to shut it down and restart it, only to find it not starting. So I moved it while running, set it down, and it has been running since.

They tell you to turn the machine off and let it cool before moving it. But this is undesirable for many reasons, chief of which is that the igniters have to cycle as the trap is restarted. These devices are just horribly unreliable, and now I have no spares. I had just replaced the igniter, and I didn’t want to cycle it, and I didn’t want to have to come back, possibly repeatedly, to make sure the trap was running. Plus, I had become adept at moving a running trap over the years.

The disadvantage is that the trap restart has not been tested. There is something wrong with this trap. It is only marginally working. The consequence is that I don’t know when the trap will fail again. Tomorrow? Next week? Next month? The next time it fails, it will be time to figure out why the tire pump pressure reading is so high, and why this uses less gas than the Defender and catches fewer mosquitos. Could the combustion chamber really be so clogged? It will be time to open it up and take a look.

Patriot on the Blink

In June, 2018, I was facing a new mosquito season with an old 2002 Mosquito Magnet Defender and a worse-looking Liberty. I needed a reliable trap to intercept the mosquitos on their way from the adjacent wetland to the house and yard, so I purchased a new Mosquito Magnet Liberty. Certainly, in the years since 2002, the company through its transitions and maturation, had been able to make their traps more reliable by fixing the problems that have been so often mentioned on these pages and elsewhere. I hooked it up, turned it on, and it “just worked.” Until the end of July, where it stopped with a flashing light, a fault. Tried restarting it, again a fault.

I hooked up the tire pump compressor to the Schrader valve, and the pump pressure gauge went to 140+ psi. This was way high. I let it run for a minute or so, but the pressure never fell, this must be a clogged nozzle. The Patriot disassembly videos showed that the Patriot was just an updated Defender, with a few improvements, and who knows how many cost saving measures incorporated. Anyway, one improvement is that the Patriot nozzle just fits into the metal case and is fixed with a single screw. There is no need to open the case to remove the nozzle, a great improvement!

The nozzle was also different. Instead of having a cone pattern, it has one single orifice right in the middle measuring about 0.31mm or about 12 mils. It has the removable sintered fuel filter that unscrews. I soaked them in mineral spirits for 1/2 hour, then into a carburetor cleaner (acetone and toluene) placed into the ultrasonic cleaner for 1.5 hours. The orifice was basically clean before and after, the fuel filter brightened up quite a bit, and passed air quite easily. I tested the nozzle using my test fittings and the tire pump, and the pressure read about 35-40 psi, which is very good (low). I also hooked up the tire pump to the Schrader valve again, and again, it read about 140 psi. Was the Schrader valve somehow blocked?

I re-assembled the Patriot after cleaning out all the awful detritus that had accumulated over two years. It started right away, and ran for almost a day before failing. I then replaced the propane tank, although it weighed ~20 lbs with a fresh one ~35 lbs. I remembered that this trap has been running for much longer than the Defender, which lasts 21 days, but perhaps the almost empty tank was causing problems. The Patriot ran again for two days. It had caught just 3 mosquitos.

This afternoon in the heat of the day (fewer mosquitos), I moved the trap to the patio and opened it up. I removed the thermistor assembly and the igniter. Amazingly, the nylon or plastic screw that holds the thermistor did not break, although it was severely darkened. What an improvement! The thermistor metal probe had some deposits that might cause a slight amount of thermal insulation, not good for a probe. I used a steel brush to clean that off, and measured the resistance while heating it with a hot air soldering station. It seemed ok, or at least it wasn’t broken. I watched the igniter during a start cycle, it turned red a bit, but not as much as I would have liked. The voltage across the igniter was 9.02 volts measured with a Fluke DVM, which is typical. I replaced the igniter with the last of my new ones, which lit up a bit hotter looking, although the new igniter was not suffering the deposits of the old one. Time to order more igniters, although these gadgets are not nearly as reliable as they are cracked up to be. This would be the second igniter that was not open but suffered from “not hot enough,” and this one came from the original trap.

Suspecting the regulator or valve, I removed the solenoid during startup and heard the clicking sound of the valve closing – the solenoid was working. Being too hot and lazy to remove the nozzle and check the flame there, I took the valve apart to expose the intake and exit. Opening the tank valve, I heard gas escaping. I lit the gas with a match, and there was plenty of flame, more than out of the Defender valve. The Patriot valve must constrict the flow additionally to reduce the gas flow, but it seems that trap delivers propane to the nozzle, I hope.

I started the trap, the thermistor assembly bracket got fairly hot to the touch, indicating combustion, but the trap went into an error code anyway. The case was not hot at that time, which is amazing to me. This makes me think the combustion and resulting temperature rise is marginal, or there is an under-value measurement issue like in the Defender. Evidently, there is a marginal condition there.

The trap has been running for an hour on the patio. Don’t sit outside near the trap! If it lasts the night, I will put it back where it protects the patio. Otherwise, I will have to investigate the “marginality” issues. Why is the temperature sometimes too low? Is it really too low, or is it a problem on the controller (like in the Defender)? Could it be too low because of an constriction in the combustion path, which would also cause high pressures with the tire pump test? I wish I had measured the trap when new for a base line. I can’t imagine that deposits would so completely clog the exhaust path to prevent free exhaust flow, but I have never been able to imagine the things that go wrong with these machines until discovered by myself or others. Stay tuned.

Don’t Forget Multiple Starts with New Tank

Another 3 weeks, another tank. It ran out yesterday, but I was too busy to replace the tank, so the mosquitos got a reprieve. Plus, I was amazed that moving my other Patriot to just outside the back patio seemed to be effective at making the patio usable for outside dining. My eldest, 16, was on the patio last week and complained of multiple mosquito bites around the ankles. Additionally, the above-ground pool was hard to use at night because of mosquito attacks. The Defender is between the pool and the (downhill) wetland. The Patriot was between the Defender and the wetland, but I moved it to outside the patio to address these problems. After moving the Patriot, the patio was mosquito free for dining. The patio dining success lulled me into slacking off the propane patrol.

Today we got over 1/2 inch of rain, but the rain has stopped, and that means joy for mosquitos. I finally decided to replace the tank, but the trap didn’t start! I forgot to turn the tank valve on. Silly mistake. I turned it on, and it still didn’t start. What now, another igniter problem?

No, the explanation is easier than that. When I was paying $20 (too much) to refill the tank, the operator used a screwdriver to turn a screw on the tank to “let out air.” She said this was necessary, especially for those mosquito trap users that run the tank down to zero. She was right. The no-nonsense Tractor Supply people will have none of this. Turn the screw yourself. I dare not. But the result is that the initial flow of gas is mostly air, and not propane. The trap will not start the first time within the starting time limit. This requires multiple starts until the air is bled out of the tank.

That’s all there is to it. If at first you don’t succeed, try, try again. That was easy.

Igniter Was Ok

Last week I wrote about restarting my venerable 2002 Mosquito Magnet Defender and discovering that the igniter was not working. I compared the old with a new one, and they measured identically 1 to 1.5 Ohms when cold. Well, I finally received a new 12 volt deep cycle battery and connected it to the old igniter, and it got hot. This means the problem was in the Defender’s or the igniter’s connector. Another point of failure. I thought I had sprayed these connectors with DeOxit, but I can’t find a record of it, so maybe not.

The igniter looked hotter than I have seen in the Defender. This makes some sense because the Defender uses a 50 foot low voltage line to connect its ac transformer to the controller, which then uses a full-wave bridge rectifier with no filter capacitors to provide a current limited rectified AC heating waveform. When initially cold, and drawing max current, the igniter pulls the rectified waveform down to about 7 volts, which is not enough to disrupt the 5v supply. The voltage rises to about 10 volts when hot. The 12 volt igniter never gets 12 volts. The impedance of the transformer and the 50 foot cable is part of the Defender’s design, which i had not appreciated until now. Very clever.

The Arduino project designer has reported that the soft start modification proposed to address his igniter reliability problem has worked out well, and that he has had many cycles of operation without a failure. With this news, and the belief that my igniter had failed, I modified the NodeMCU software to implement an igniter soft start, just a few more lines of code. I believe this is a really good idea, because I have gone through several igniters, although their failures have been related to rapid restart cycles caused by other unrelated trap faults (e.g., intermittent on/off switch).

But now, with a connector issue lurking, a nagging doubt has formed. It has to do with dry circuit contacts. As oxidation forms on an open switch contact, it is helpful to have a significant potential (voltage) between the contacts to break down the new oxidation layer and make a good connection. Relay and switch contacts that do not require this voltage are called “dry contacts.” They must not oxidize (a la gold). It is easier to just seal the contact and add some mercury, as in an old fashioned thermostat. Now, think of a connector with no current flowing (e.g., the igniter connector), but subject to temperature and humidity fluctuations. The resulting contact movement allows an opportunity for surface oxidation at the various potential points of contact as they shift around. When the voltage is switched on, if the layer is too thick, the oxidation does not break down, and the desired current does not flow. I believe this is what happened to my Defender.

The traditional way to deal with oxidation is with hard starts: full potential applied to break down any oxidation or other insulating layer. So a soft start would seem contrary to that principle, and improve the life of the igniter at the cost of making the oxidation problem worse.

The soft start desired is that the igniter warm up slowly so that the temperature and the resulting expansion is uniform throughout to reduce stress on the heating element. Traditionally, soft starts are accomplished by slowly raising the voltage, as in slowly turning up the voltage knob on an autotransformer (e.g., Variac). However, pulse width modulation (PWM) rapidly switches the full potential on and off. The desired percentage is the on time to period ratio. Slowly increasing this percentage provides a soft start while applying full potential with each pulse. This might even improve the oxidation punching characteristics, although the unfiltered AC waveform might do the same thing already. On the other hand, the large inrush current when cold might cause other problems in the igniter, but this current is already somewhat limited by the original Defender design.

It seems that this new approach should be tested and deployed, however, it is peak mosquito season, and the Defender is busy. I do have a spare Liberty that is sitting idle. Do I dare modify the Liberty to make an IOT Defender plus? This would have the additional benefit of being helpful to those Liberty owners experiencing issues. Stay tuned.