Defender Arduino Design
Posted by beads
|
Best cleaner/solvent? June 05, 2021 10:33PM | Registered: 3 years ago Posts: 152 |
While we are talking about Brake Cleaner and MAF cleaner, etc, it's probably a good idea to break them down. I'm not an expert on them, but there's my understanding on each of them, others can chime in:
Brake Cleaner - Primary purpose to clean oil off brake components. No residue but can damage rubber and vinyl parts
Carb Cleaner - Strong cleaner for dissolving varnish and tough deposits. Safe for rubber and vinyl, but likely to leave oil residue for lubrication and protection
MAF Cleaner - Gentler cleaner, won't damage rubber or vinyl, and doesn't leave any residue.
So, brake cleaner is probably a better cleaner for the nozzle since it has no parts that can be damaged by it. Perhaps you can also use the strong carb cleaner first to clean it out, and then use brake cleaner to remove the oil residue.
For cleaning out the catalytic converter, I have only used MAF cleaner. Brake cleaner might work too, but you definitely don't want to use carb cleaner on this.
|
Nozzle Tip Unscrews? June 06, 2021 03:45PM | Admin Registered: 7 years ago Posts: 164 |
These nozzles unscrew inside? It would certainly make inspection and cleaning much easier. Could the screw also be part of an adjustment? If so, it might be prudent to leave it well enough alone, given that adjustment would require some unknown test method and fixture.
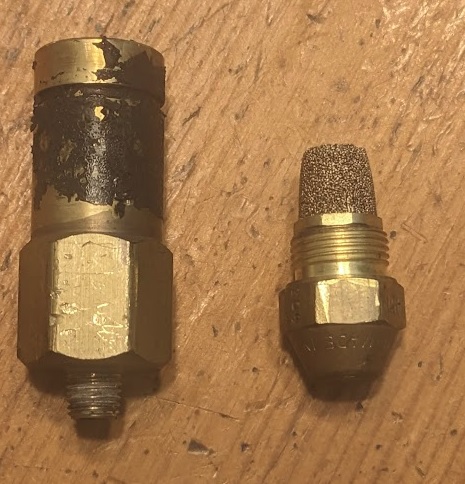
Thanks for the picture. Which nozzle is shown?
Thanks for the picture. Which nozzle is shown?
|
Re: Nozzle Tip Unscrews? June 06, 2021 07:02PM | Registered: 3 years ago Posts: 152 |
dev Wrote:
-------------------------------------------------------
> These nozzles unscrew inside?
Indeed. There is a slot on the brass screw pin which allows a flat blade screwdriver to unscrew it from the body. The screw pin holds the distributor against the tip of the nozzle. I don't think there is any adjustment as the screw pin just holds the distributor in place against the tip. I've had it apart many times and the nozzle still functions correctly.
> Which nozzle is shown?
I believe all these nozzles are similar, differing only in the distributor and orifice design. The shape of the distributor and the way the tangential slots are cut helps shape the spray pattern and flow rate of the nozzle, along with the size of the orifice.
Edited 1 time(s). Last edit at 06/06/2021 07:03PM by Independence.
|
Re: Defender Arduino Design August 15, 2021 06:15PM | Registered: 4 years ago Posts: 27 |
Just an update.
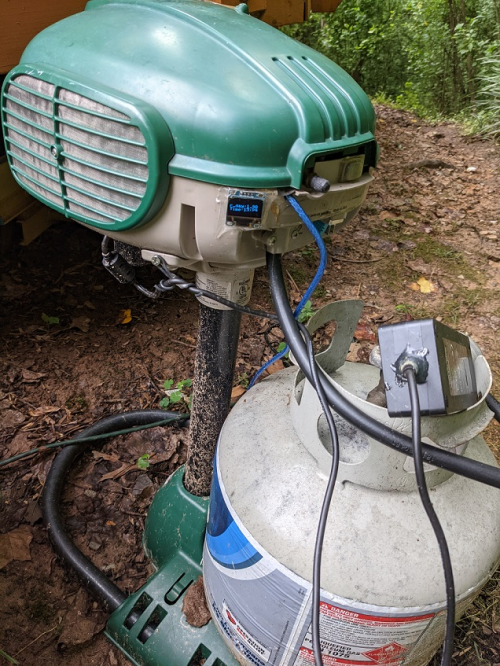
My primary Mega Defender “locked up” a week ago; the OLED display was on but it stopped cycling through the data, and the propane was on 24/7. The time was not indexing. The Defender was still running, but always on; it is likely that if it locked up while in Sleep Mode, that wouldn't have been true. When brought down to the workbench and the blue USB cable was plugged in, there was a USB audio “bong” but the Arduino IDE wouldn’t connect. It turns out the A-side end of the cable had some corrosion and deterioration from the two seasons outside. As soon as the cable was swapped, everything went back to normal. This highlights an earlier post- most of the Mega Defender “stuff” was used for troubleshooting and selecting the best operating values. The Defender is back outside and it has been working perfectly since. It seems obvious now, but there really isn’t a need to leave the USB cable attached to the Arduino Mega; plus the cut out for the cable is one more place the weather & bugs can enter.
For troubleshooting and testing, below is a mod to the main code that cycles the propane valve and then fan three times, and then applies power to the igniter. If you have a “kill-o-watt” monitor (great to have as a home tool), the operation of the MOSFETS can be checked without removing the cover, since the igniter draws over 0.4 amps when it is running; the other two are easily audible.
Other than that- the backyard mosquitos are definitely knocked back, though not eliminated. A propane tank lasts just over 40 days with the current software (rev20A).
//   Mega Defender Mosquito Magnet
//MOSFET Tester 25  April 2020
#include <Wire.h>
#include <SD.h>
#include <SPI.h>
#include <dht.h>
#include <OneWire.h>
#include <DallasTemperature.h>
#include <SoftwareSerial.h>

#define amb_temp 8// ambient DHT temp/humidity
#define igPin 9 //igniter
#define fanPin 10 // fan
#define valvePin 11 // propane valve
#define sd_card 53
#define gasPin A0
#define thermistorPin A1
#define Temperature_ONE_WIRE_BUS 2 // good temp sensors
#include "SSD1306AsciiAvrI2c.h"//OLED Display driver and address
#define OLED_ADDRESS 0x3C //set I2c Address, OLED specific

dht DHT;
SSD1306AsciiAvrI2c oled;
OneWire oneWire(2); // DS18B20 temperaure sensors
DallasTemperature sensors(&oneWire);
SoftwareSerial BTserial(19,18); // RX | TX

  bool start = false;
  float chk;
  int ignit =0;
  float start_time = 299;// total igiition cycle until timeout; ~300 seconds works
  float lightoff = 10.1;// delta T (deg F) for ignition
  float temp = 0;
  float dTemp = 0;
  float aTemp, iTemp,a2Temp;
  unsigned long readsec,initTime;
  int elapsed;
  float propane_hours, total_hours, propane_days, total_days;
  float x = 0, y = 0, z = 0;
  int sec = 0;
  byte iMinute = 0;
  byte second, minute, hour, dayOfWeek, dayOfMonth, month, year;
  float hours, dec_hour, dec_min;
  String stat = "INITIALIZE"; String stat2 = "unassigned";
  float gas_sensor, thermistor;

File myFile;

#define DS3231_I2C_ADDRESS 0x68 // Real time clock
byte decToBcd(byte val){
  return( (val/10*16) + (val%10) );}
byte bcdToDec(byte val){
  return( (val/16*10) + (val%16) );}


void setup(){
  Serial.begin(9600);
  BTserial.begin(9600);
  initTime = millis()/1000;

  pinMode(fanPin, OUTPUT);pinMode(igPin, OUTPUT);pinMode(valvePin, OUTPUT);

    digitalWrite(valvePin, LOW);//propane off
    analogWrite(fanPin, 0);// Set fan to mid speed; range is 0-255
    analogWrite(igPin, 0);// igniters off until called

  sensors.begin();
  delay(500);
  get_temps();


  oled.begin(&Adafruit128x64, OLED_ADDRESS); //OLED Display initialize
  oled.setFont(Adafruit5x7);
  uint32_t m = micros();
  oled.clear();

  refresh_oled(); //Show initialize screen to check temp sensors
  delay(500);// wait 6 seconds to allow OLED screen to be read and settle gas sensor
}


void loop(){

   get_temps();
   iMinute = minute;
   readDS3231time(&second, &minute, &hour, &dayOfWeek, &dayOfMonth, &month, &year);

   dec_min = minute; dec_hour = hour;
   hours = dec_hour + (dec_min/60);


       for (int zz = 0; zz<= 2; zz++) { // run valve check
         Serial.print(zz);
         digitalWrite(valvePin, HIGH); Serial.print("   propane on");
         delay(1000);

         digitalWrite(valvePin, LOW); Serial.println("   propane off");
         Serial.println(); delay(1500);
       }

       for (int zz = 0; zz<= 2; zz++) { // run fan check
         Serial.print(zz);
         analogWrite(fanPin, 210); Serial.print("   fan on");
         delay(1000);

         analogWrite(fanPin, 0); Serial.println("   fan off");
         Serial.println(); delay(1500);
       }

       analogWrite(igPin, 255); Serial.print("   igniter on");
       delay(12000);analogWrite(igPin, 0);
       delay(3000);
     }
|
Re: Defender Arduino Design July 09, 2022 08:59PM | Registered: 4 years ago Posts: 27 |
Is this thread still getting visits?!?!
Has anyone tried using an Arduino to improve their Mosquito Magnet?
My ten year old Mega Defender has been up and running for six weeks now, and in the last week has been catching mosquitos like crazy; partly due to very wet weather, and partly (mostly?) because I found a very good replacement to the discontinued Lurex3 attractant and just starting using it this week. I am still using Octenal as well- but no Asian Tiger mosquitos fall for that stuff.
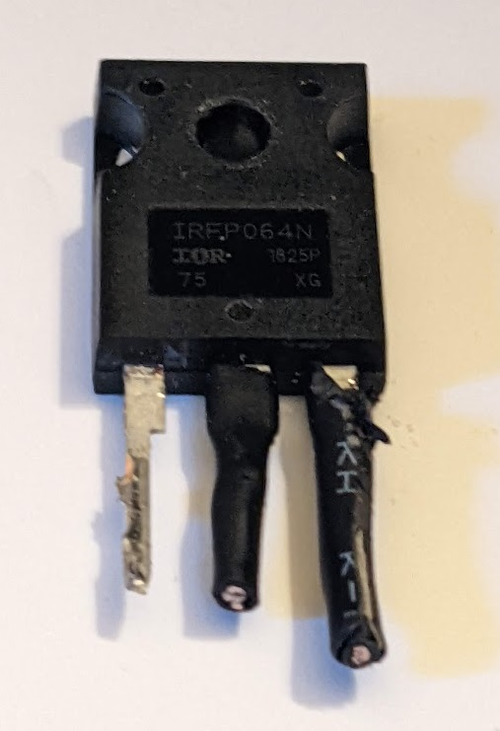
The season didn’t start smoothly. Though the system powered up immediately and the OLED display showed all things in order, there was no lightoff. After a lot of troubleshooting, it turns out the big 55 amp MOSFET for the igniter had partially failed (see picture). That was literally the last thing I expected and checked, but as soon as it was replaced everything was fine. I also used an air compressor to blow air through the valve/filter. It had been two years since a CO2 cartridge was used, but the great write ups about the clogging made sense. My Mega defender now lights off perfectly twice a day, every day, and is catching lots of biters.
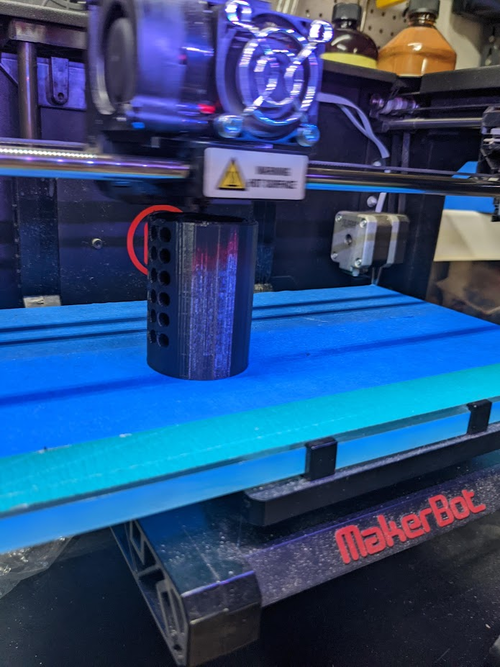
I also 3D printed a new Lurex3-like attractant holder. The person who posted the STL file (print file) also describes how to make a Lurex3 substitute in the write up. I bought the chemicals to replicate Lurex3, but the new Biogents attractant is working well, so it can wait.
The only change made to the code is to update the OLED display info so I can see it without reading glasses, and have the propane come on at 05:30 AM vice 6:00 AM.
Finally, someone commented a while back that they thought Mosquito Magnet folks were reading this blog. Based on the features in the new Mosquito Magnet Executive version, which sells for a very steep $904 per unit, they sure have incorporated a lot of things that my Arduino already has had for years. Extra external temp sensor, built in clock, a display, propane cycles on and off…almost too many to believe it was pure coincidence…but maybe. I called their offices directly two years ago- twice- and was told “thanks but no thanks”. Funny, since I specifically said I was not asking for compensation. Maybe I should have applied for a patent! With the sky high cost of propane this year, having the Defender switch off when no mosquitos are around makes perfect sense, and very quickly covers the cost of the Arduino and components.
Please post if you have tried or even though about trying to gut the control system and use and Arduino or SBC to manage the components. I you have questions about how to pull this off, I'd be glad to help!
Good hunting!
Beads
|
Thread and Igniter FET July 10, 2022 03:26PM | Admin Registered: 7 years ago Posts: 164 |
Is this thread still getting visits?
So it would seem from the site statistics, but there were no new posts on any thread until yours, or (legitimate) new user requests. Of course the forum is pretty complete and has a lot of information already, and is a good resource. Your posts about the FET and attractant are unique as far as I can tell.
... it turns out the big 55 amp MOSFET for the igniter had partially failed ...
Wow. How could this possibly happen? Also, does "partially" mean the on resistance was too high?
You wrote that you are using a ramp-up pulse width modulation scheme to gently warm up the igniter. However, this does switch the largest initial "surge" currents through the MOSFET, but 55 amps? Your power supply could not deliver that much current, although a large low ESR capacitor on the supply line might. The igniter is not an inductor like the solenoid, so there should be no voltage flyback pulse to cause breakdown. So maybe the MOSFET got too hot during a turn on ramp up. This could be caused by heatsink failure or insufficient drive to the MOSFET, resulting in the MOSFET operating in its linear region dissipating a lot of power and getting too hot. The drive may be insufficient because of a combination of the switching frequency, MOSFET effective gate capacitance, and Arduino output pin drive current limits. You can put a scope on the MOSFET's gate and see if the waveform is a square wave with sharp edges, or if it has sloped edges indicating current limiting driving the gate. If so, adding a higher current driver would fix this issue. You might get away with a larger heat sink (perhaps use a compression washer to make sure it stays tight) and improved thermal conductivity to the heat sink.
BTW, the MOSFET operating in it's linear region would limit the inrush current to the igniter, a desirable effect. I am unsure of the effects of short pulses of high current on the igniter to simulate current limiting, which is the desired result.
It's funny that the company refused your help and copied the functionality described on this forum. But $904 for a trap? That's pretty steep.
|
Re: Defender Arduino Design July 11, 2022 06:21AM | Registered: 3 years ago Posts: 152 |
beads wrote:
Based on the features in the new Mosquito Magnet Executive version, which sells for a very steep $904 per unit, they sure have incorporated a lot of things that my Arduino already has had for years.
If I'm not mistaken, the Executive was launched in 2010, and they also launched a wifi version in 2012 called the Commander, so they have had these features available for a while, but choose not to include them in all their models. They also discontinued the wifii version pretty quickly. I think most people just 'light em and leave em running' so the market for smarter devices may be more limited.
|
Re: Defender Arduino Design August 07, 2022 12:45AM | Registered: 4 years ago Posts: 27 |
Just a quick follow up...
I tried the home-made attractant that was supposed to mimic Lurex-3 (link in my previous post), but after a week had a significant slowdown in the number of mosquitos trapped, and zero Asian tigers. I switched to the Biogents attractant- though a bit more expensive than Lurex3, it works well. Not only that, but the Asian Tigers made up more than half of the trapped biters. The 3D printed cartridge works great; I modified the design with a single chamber so the Biogents breathable packet fit inside cleanly. It isn't much, but if anyone needs the STL (the 3D print file), let me know.
Biogents
The Mega Defender is working like a champ; it comes on twice a day, and by doing so cuts propane usage in half. Earlier this season I ran the Mega Defender 24/7 over the weekend and checked the trap often; there really weren't any biters caught from late morning to late afternoon, or overnight past about midnight, at least in my area.
We still have a fair number of mosquitos in our backyard this year with lots of heavy rain and warm temps, but the Mega Defender at least gives us a chance to be outside.
Good hunting!
Beads
|
Re: Defender Arduino Design August 24, 2023 01:13AM | Registered: 4 years ago Posts: 27 |
The trapping season is getting along, and the now ancient Defender is still catching tons of those nasty mosquitos. That Biogents attractant seems to really do the trick, especially with Asian tiger mosquitos. I also have been using the Octenal that I bought online from someone in the Ukraine; the combination seems to do the trick.
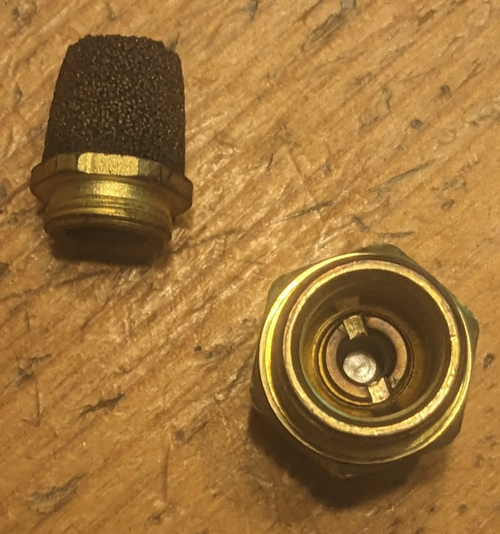
Of note this year is I absolutely could not get the MegaDefender to light off- despite perfect indications from the Arduino that everything was working. True to the folks who made the earlier posts about cleaning the nozzle, I bit the bullet and dissembled the burn section, and found the brass nozzle assembly was caked with black “soot.” I used carb cleaner and 100 PSI from a compressor to clean it once fully taken apart, and lo and behold, it lit off perfectly after reassembly (and subsequent trouble shooting to find the loose/disconnected Arduino wires caused by separating the metal halves). One thing for sure- the Arduino wiring is NOT designed for burner section disassembly!
BEFORE:
AFTER:
My defender is so old- it is amazing that it still works so well. Then again, there are only two powered moving parts (gas solenoid and fan), plus the igniter and temp sensor.
Hope everyone has been wiping their local area clean of those biters!
|
Re: Defender Arduino Design August 24, 2023 02:11AM | Registered: 3 years ago Posts: 152 |
Ha ha, I've been getting so lazy now that I don't even bother disassembling the unit to clean the nozzle. Since mine starts up twice a day, a failure to light screws up the schedule so now I just blow cleaner through the Schrader valve with a 100psi compressor at the beginning of every season. Seems to do the job...
|
Re: Defender Arduino Design April 30, 2024 02:39AM | Registered: 17 days ago Posts: 5 |
|
Re: Defender Arduino Design May 02, 2024 09:21PM | Registered: 17 days ago Posts: 5 |
|
Re: Defender Arduino Design May 03, 2024 11:40AM | Admin Registered: 7 years ago Posts: 164 |
...How hot do those MOSFETs get? I'm considering how effective the cooling needs to be. I'm planning to use an aluminum heatsink from an old Nvidia card, which I'll cut to fit in place of the old motherboard.
They should not get very hot at all. The igniter FET switches the most current, but their on resistance and the resulting voltage drop across it is low, so not much power is used by the switch. There might be more information on the wiki, or elsewhere in the forum. Also, the igniter is on for only a few minutes to start ignition. The continuous running fan and solenoid switches use even less power.
In any event, the original Defender MOSFETs are just mounted to the PCB, with no other heatsink. The original devices have worked reliably even with a significantly lower drive voltage (from a 3.3v NodeMCU controller instead of the original 5 volt controller). I found it a lot easier to disable the original controller and wire the NodeMCU controller to the original PCB.
|
Re: Defender Arduino Design May 03, 2024 11:45AM | Admin Registered: 7 years ago Posts: 164 |
(Late reply)
...now I just blow cleaner through the Schrader valve with a 100psi compressor at the beginning of every season. Seems to do the job.
How is this done? In other words, how does one use an air hose from a compressor to blow cleaner through the Schrader valve to the nozzle? Some sort of "paint gun" attachment? Is there sufficient air flow to pick up the cleaner? Even when clogged? This sounds much better than just a tire pump alone.
|
Re: Defender Arduino Design May 03, 2024 06:28PM | Registered: 17 days ago Posts: 5 |
I'm nearing completion of the design for the Arduino board to fit the old Defender.
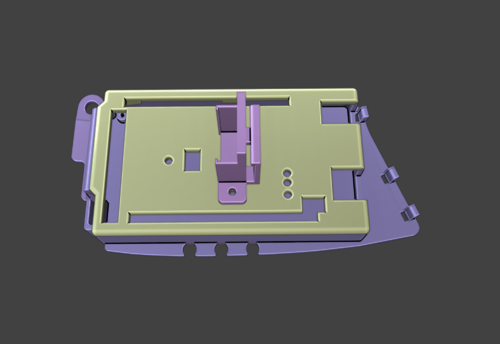
Top View
It's a complete enclosure with a cover for the Arduino. On the top cover, the Propane Sensor MQ-2 will be mounted.
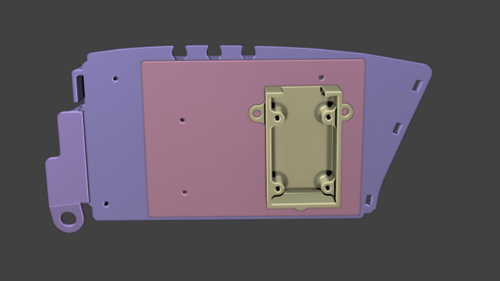
Bottom View
Two other boards will be located here - the Real Time Clock DS3231 and the Bluetooth module.
The aluminum heatsink will be attached to the original mount for the original PCB. The SD card reader will be positioned beside the original power cable mount, and the USB port will replace the original power cable. I'm still undecided about the location of the display; I intend to place it inside the case with a plexiglass window. The cables connected to the engine shell will have detachable plugs for easy removal. Once completed, I will share all files and photos.
|
Re: Defender Arduino Design May 04, 2024 12:55AM | Registered: 3 years ago Posts: 152 |
How is this done? In other words, how does one use an air hose from a compressor to blow cleaner through the Schrader valve to the nozzle?
Ha ha, nothing special here. I just squirt some cleaner into the schrader valve, and then put an air chuck onto it. It only gets a bit of cleaner at a time, but if you do it regularly enough, it seems to keep it clean enough...
Ha ha, nothing special here. I just squirt some cleaner into the schrader valve, and then put an air chuck onto it. It only gets a bit of cleaner at a time, but if you do it regularly enough, it seems to keep it clean enough...
|
Re: Defender Arduino Design May 04, 2024 01:00AM | Registered: 3 years ago Posts: 152 |
Dank0 Wrote:
-------------------------------------------------------
I'm nearing completion of the design for the Arduino board to fit the old Defender.
Ah, now you are descending into the depths of Mosquito Magnet hacking.... have fun! You'll see several different versions on here that were done over the years by different folks. Most of us are now done and have stable versions, so not much is happening anymore.
Sorry, only registered users may post in this forum.
